Home Page › Forums › Discussion Topics – Ask the Experts › Sandy's 63 Jetfire 4 spd manual
- This topic has 76 replies, 8 voices, and was last updated 2 years, 1 month ago by
 graytoad.
-
AuthorPosts
-
May 9, 2020 at 9:53 pm #16777graytoadParticipant
The final step before preparing to paint the engine bay & front end was the final underneath clean. We set the car upon the hoist with a ‘giant diaper’ of tarps so we could keep the dirty water flowing out the door of the shop. Steve first sprayed it with degreaser then pressure washed. I manned the floor squeegee and Haz-Mat Man got real dirty! (had to hose him down after) We are amazed at the awesome rust free condition of this car. This photo was taken before I did a final hand washing. This is under the gas tank area. As you know the entire unibody was drenched or dunked in a red primer and there are many spots under the car where there are dried drops of paint.
Attachments:
You must be logged in to access attached files.
May 9, 2020 at 10:30 pm #16782graytoadParticipantSorry, I did not include a ‘post pressure wash’ photo in last post as stated.
Results of the pressure washing and brushing, I have since hand wiped the underside of the car. Seriously as ‘rust free of a car’ you could ever hope to find!
All the F85’s bodies were built as automatics. If it was a 4 speed order they cut a hole in the transmission tunnel and welded in the bigger hump. All of them were done like this and the actual hole was rather roughly cut and they are all slightly irregular to the next 4 speed car. If you didn’t know better you would swear someone did a conversion: well yes it was – but it was done like this at the factory. I am happy I have the protecto plate to prove it was a factory 4 speed as you seriously question that when you see it. The bottom portion of the firewall and tunnel was sprayed with a heavy undercoating which some of it survived Haz-Mat Man’s attack. We have since recoated it.Attachments:
You must be logged in to access attached files.
May 28, 2020 at 8:19 pm #16907graytoadParticipantWe discovered a hole in the driver’s side fender where the horn was mounted rather poorly: vibration broke a chunk right out of the fender. Another Jetfire owner mentioned they had this trouble too. Relocation of the horns due to the TRF tank apparently was not thought out well. We used the chunk that broke out that was still attached to the horn to fix the hole.
[blockquote]BBCode you used is not allowed.[/blockquote]
Next, following another wipe down with pre-paint cleaner – we painted all the lower front frame section, the A arms, wheel wells etc.
[blockquote]BBCode you used is not allowed.[/blockquote]
A photo from below
[blockquote]BBCode you used is not allowed.[/blockquote]
Some of the final sanding and prep work. All the surface rust was removed and in some areas we sprayed with rust encapsulator, then whole bay was primed first then finish painted. The rad support and all of the other black areas were repainted too
[blockquote]BBCode you used is not allowed.[/blockquote]
[blockquote]BBCode you used is not allowed.[/blockquote]
Attachments:
You must be logged in to access attached files.
May 28, 2020 at 8:27 pm #16913graytoadParticipantPrimed, Painted & Done!
Attachments:
You must be logged in to access attached files.
July 22, 2020 at 8:16 pm #17018graytoadParticipantOver the winter I received my Turbo back from ‘our favorite Turbo Guru’ – Jim Noel of Bloomington Minnesota – who did a complete rebuild on the unit – looks brand new! We also delivered the engine block to Mark at D&D Aluminum V8 in Michigan before heading to Florida. Mechanically this car will be fully restored – Done once and done right! The rest of the car will be given all the love an attention it has been missing for over 30 years and we will bring the best out of ‘what we have’! Over the years we have been more into restoring our cars to somewhere between ‘top driver quality to show quality’. Wanting the mechanicals dependable and trouble free means restoring those systems for the most part. Having the turbo and engine rebuilt and looking fabulous leads to – ‘we may as well restore it all under the hood’. This car was an unmolested rust free original: where do you stop while wanting to keep it as such? I am sure there will lots of opinions about this but I guess for me the answer is: It is my car and I need to enjoy it as I see fit!
AS OF TODAY, July 22, 2020: the US/Canadian border is still closed to everyone but essential services so Mark at D&D is still babysitting my engine and we are tinkering away on all the other thing that need doing!Attachments:
You must be logged in to access attached files.
July 22, 2020 at 8:39 pm #17021graytoadParticipantSteve has been working on some of the interior details. He removed the carpet and cleaned the floors. We found our first ‘real rust’ however it was surface rust in the two foot well areas: an indicator that cowl area of the car had done some leaking to the inside of the car. The car had been stored in the same spot of the original owners drive in shed for over 30 years. The roof had been leaking onto the hood area of the car which did a lot of damage to the general condition of the paint on the hood and cowl. However, I do not think this was the source of this rust as the car was not at all mouldy and musty smelling which would be expected on vehicle parked in a garage in California with the windows up. I am assuming the leaking that caused this would have likely happened while the car was still on the road back in the early 80’s. Anyway, the rust was surface type, there were 2 small pinholes we found but the surrounding metal is still solid. Steve cleaned up those rusty areas well with a wire brush then sprayed a couple coats of rust encapsulator to halt that process. We did actually find a hole that was a ‘factory error’. As most of you know, all the bodies were initially built for automatic transmissions. If a 4 speed manual shift was ordered, the assembly line guys cut a section of the transmission hump using shears. I am assuming they had a template they traced around then sheered out the section making every 4 spd hump slightly different based on the accuracy of the shear operator. The 4-speed hump, which is slightly bigger than the cut was then welded into place and a sealant putty spread on the inside to smooth it out then underneath an undercoating was sprayed in the overall tranny tunnel area. Anyway, we found an irregular hole at what I would call the right rear corner of the hump and the putty may have initially filled that hole but it certainly did not show signs of ‘having a chunk missing’ – but there was not putty and there was a hole! Steve filled the area and added Dynamat to the entire car floor which will make the car a nicer beast to drive.
Attachments:
You must be logged in to access attached files.
July 22, 2020 at 8:46 pm #17026graytoadParticipantSteve also installed a factory clock in the dash that Ken Dennison had brought to my attention on ebay. Apparently, the clock was an item that was added to the car on the assembly line or possibly at the dealership) after the completed dash was installed as the ‘Assembly Manual’ has instructions on how to install the clock. Of course, when purchasing NOS things, sometimes it is not all there: the mounting plate was not so we had to figure out how to correctly drill a hole and center the clock. We started by screwing the blank plate to a block of wood. We had a hole saw that was 1/8” too small, we placed the hole saw without it’s center drill in place, dropped in a center punch to mark where to start the drill tip and gave it a whack with a hammer. After drilling the large hole through the metal, I continued drilling out about ½” deep into the wood. I chiseled out the disc of wood so that the cutting mandrill had somewhere to go as we enlarged the hole. The filler trim piece has the F85 logo bit that fastens to that plate just like a fender badge. I will use it to dress up a removable drink console I want to make to sit between the seats for when driving.
Attachments:
You must be logged in to access attached files.
July 22, 2020 at 9:11 pm #17029graytoadParticipantI have been sending many hours working on all the exterior bright trim, but I am not quite done yet. I completely disassembled the front grill and headlight assemblies. All the bright trim has been re-polished by hand, the black background accents repainted, the OLDSMOBILE letters repainted as well in the grill. Everything was reassembled and reinstalled including the original T3 headlights and it looks amazing. I also removed the marker lights in the bumpers, cleaning and polishing the lenses and housings. The side trim as received lots of my love as well. In cleaning up the Turbo turbine logo portion I discovered that the turbine groves originally had red in the slots. A few other Jetfire owners with ‘original unrestored cars’ confirmed that their turbines have remnants of red in the turbines too. The red appeared to be a translucent/candy type of paint and I settled on Dupli-Color Perfect Match automotive paint #CBFM0188. (yes I know, FM stands for Ford Motor Co). I sprayed the paint into an empty lid and used a small brush to brush it into the slots…. all 75 of them! After the paint was mostly dry, I used a bevel cut popsicle stick to clean off the top sides of the ribs of the turbine blades – perfection!
Attachments:
You must be logged in to access attached files.
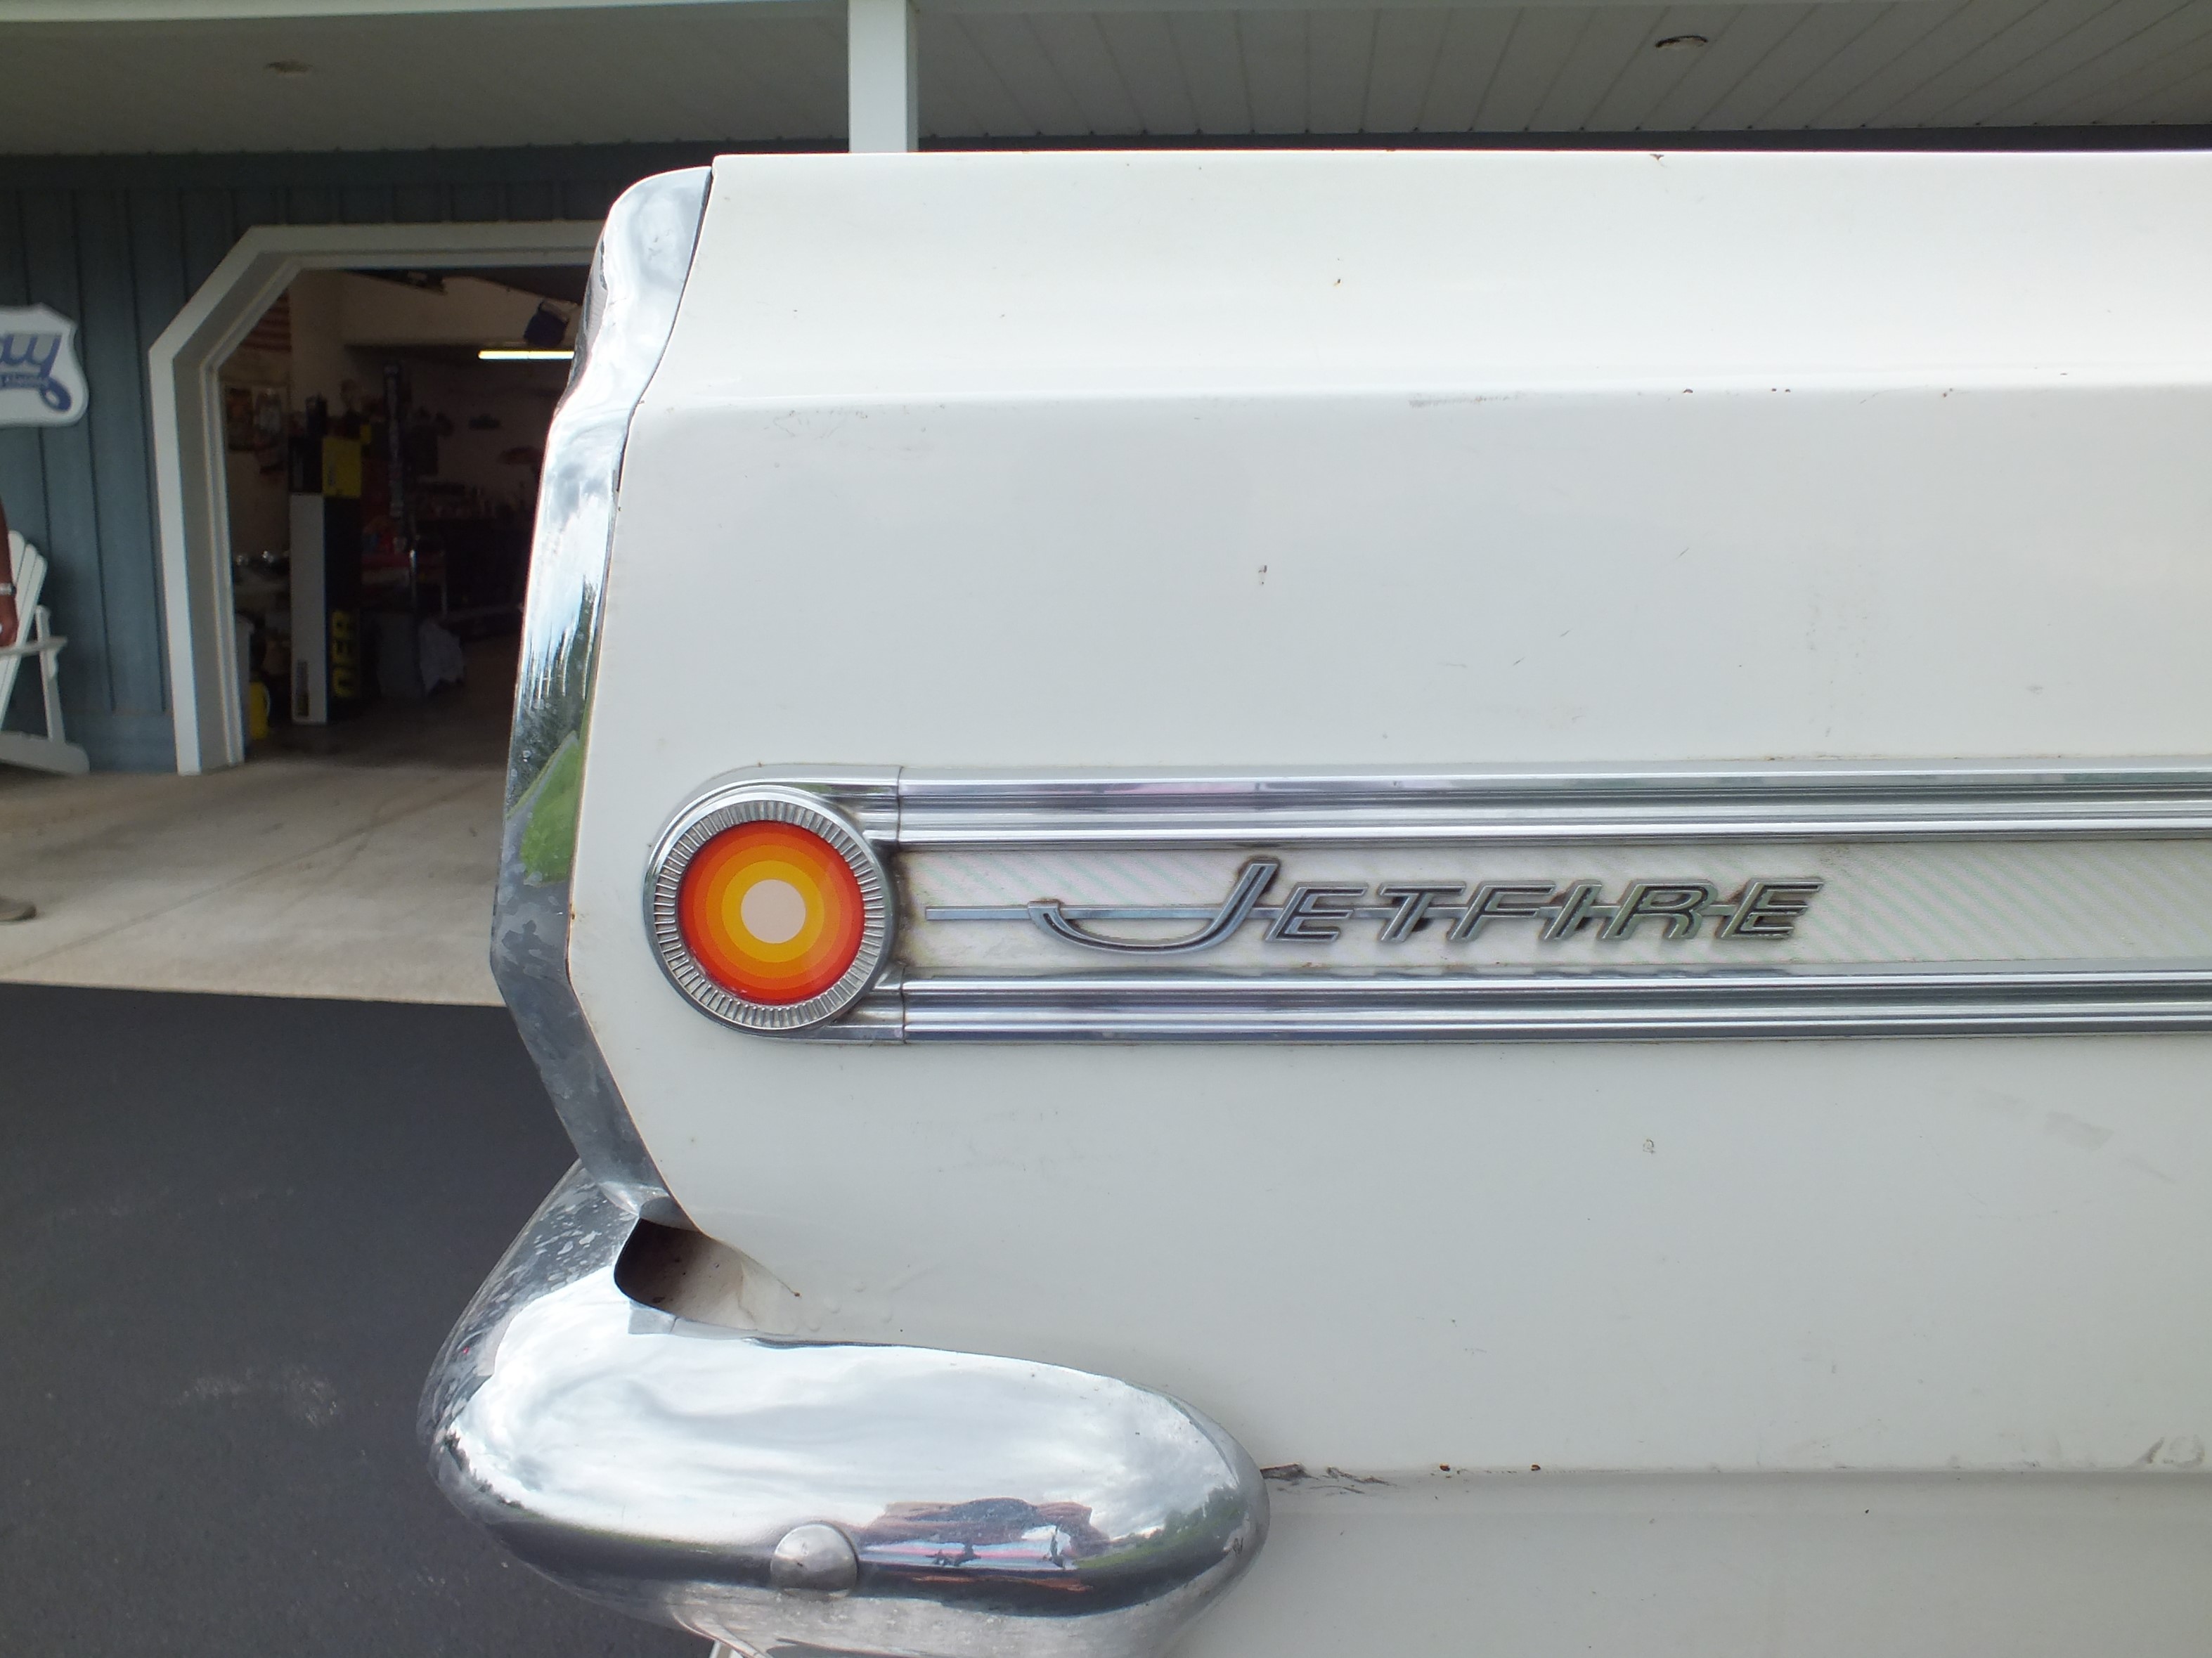
July 22, 2020 at 9:51 pm #17035graytoadParticipantTurned my attention to the tail end. The paint around the trunk letters was really age stained so even though we are not repainting the car at this time – I wanted those letters removed in order to polish the paint as best as we could. We discovered the letters have flat tabs on them and there are some tiny – hard to buy clips that go into the slots cut into the trunk lid to hold them in. It is good to have friends who love Oldsmobile’s too as I managed to get the clips I needed thru Eric Jensen! As we are not removing the bumpers right now I had to restore the F85 logo in place and sprayed the same paint I used in the turbines (and on my hubcaps) and hand brushed the satin/flat black background paint. Fortunately for me I did not have to repaint all the black lines in the rear end trim at this time, they just needed a good cleaning!
I removed all the lenses in my tail lights assemblies to clean them up and re-silver the reflector housing in spots. I decided to swap out the passenger side tail light assembly with another one that came with the car as the passenger side was badly pitted. The replacement one was not perfect either but in much better shape. I was surprised on how clean it was in the tail light pocket, amazing. When we reinstalled, I first added some putty sealant as I wanted to make sure the gasket sealed well once again, as it had been previously installed in another 63 F85.Attachments:
You must be logged in to access attached files.
August 5, 2020 at 2:40 pm #17044 tbirdz12Participant
I have a very original, unrestored 4 speed, neither side of mine show any color..
-
AuthorPosts
- You must be logged in to reply to this topic.


