Home Page › Forums › Discussion Topics – Ask the Experts › Restoration of our 62 4 speed Jetfire
- This topic has 209 replies, 9 voices, and was last updated 5 years, 1 month ago by
 jensenracing77.
-
AuthorPosts
-
February 21, 2020 at 5:37 pm #16358jensenracing77Participant
License plate light is done and ready to go back on. Yellow zinc plated and the screws were clear zinc.
Attachments:
You must be logged in to access attached files.
February 22, 2020 at 12:48 pm #16361jensenracing77ParticipantSome other parts I have ready. Just noticed I put the clips on the TRF bottle holder upside down, lol. Now I will have scratches in the paint taking them off. The color of the clips were a red oxide color and I want to repaint those anyway.
Attachments:
You must be logged in to access attached files.
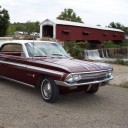
February 22, 2020 at 2:01 pm #16365jensenracing77ParticipantThe body guy just sent me a picture. Looks like he is making headway.
Attachments:
You must be logged in to access attached files.
February 22, 2020 at 3:44 pm #16367 Greg OakleyParticipant
Here is my TRF bracket clips original paint.
Attachments:
You must be logged in to access attached files.
February 22, 2020 at 3:58 pm #16369jensenracing77ParticipantThat is what mine looked like till I messed them up. I was not going to paint them at all but made the wrong choice. Now I have to redo them. I think I have three others somewhere.
February 22, 2020 at 4:09 pm #16370jensenracing77ParticipantThis is what mine did look like. I will fix them
Attachments:
You must be logged in to access attached files.
February 27, 2020 at 12:11 pm #16372jensenracing77ParticipantI took detailed pictures of my inspection stampings and also cut some others out from my parts cars. I took them to the local printing store and they are making me rubber stamps so I can duplicate them. The top corner of the O for OK is slightly off for the / style but I am not going to make them redo it. Just need to find the proper shade of yellow now.
Attachments:
You must be logged in to access attached files.
March 1, 2020 at 4:07 pm #16375jensenracing77ParticipantI have not been able to get time to go out to the body guys house. My wife sent me out shopping for groceries today and bumped into a friend of my body guys. He said that it was getting painted the final coat today! I don’t think that counts the white top but not sure. I am sad because I wanted more pictures of his work at his place.
March 3, 2020 at 7:13 am #16376jensenracing77ParticipantI never finished the story on my radiator. I had a thin coat of paint on the radiator the day I got it home but it was humid and turned the paint milky. I later painted it again and had a couple cans of engine paint. Turned out that they must have had some paint mixed up on the shelf because one of the cans was interior vinyl paint. I did not notice till I already painted the radiator. I went over that with the correct paint but it has been bothering me because it is not right. I am now going to paint a scrap radiator I have with the same paint in the same coats of each style of paint. After it is cured I will start testing ways to strip it off. I hope I can come up with a way to strip it and not hurt the fins or copper. When I figure out the best way I will strip my good radiator. I am wondering if I soak it in a pan of lacquer thinner if that would work good enough. I would rather not use paint stripper but may try it also. Any ideas? Even thought about turning the air down on my blast cabinet and trying to bead blast it but I would be shaking glass out of it for a really long time.
March 4, 2020 at 5:50 pm #16377jensenracing77ParticipantStamps came in
Attachments:
You must be logged in to access attached files.
-
AuthorPosts
- You must be logged in to reply to this topic.